
I have moved the posts over to my new blog Etsy101.blogspot.com Hopefully it will be easier to remember. All current posts will stay on this site. All new posts will be on the new website. If you link to this blog, please update your link to the new blog.
Thanks!
:)
Saturday, July 12, 2008
Monday, July 7, 2008


Wednesday, June 25, 2008
Taking Pictures ~ What works for me
Do not use the zoom. Get as close to your object with no zoom. The colors and quality will be a lot better.
Purchase White posterboard for the background; for my white objects I also have light blue, yellow, light pink and neon green.
I use a light box (Photos of my Box), but it isn't needed.
For small items, curve a piece of posterboard in front of a window with lots of sunlight (not direct light). You can use pieces of cardboard like this post by donnapool Donna's Taking Pictures Tips
With a light box ~ Manually set the white balance with a sheet of extra bright white computer paper.
Change the EV Shift to a brighter setting (mine is at +1.3) ~ it makes the photos brighter before editing them on the computer. I learned how in this Storque article, bright-light-big-color-using-ev-and-white-balance
Set camera to the Macro Setting for upclose objects.
My camera (not a new fancy one) allows you to save the settings based on previous photos you have taken. When I get a photo that the color looks really good and it is easy to clean up, I save it so I can easily go back and start from that point the next time.
Here is a blog post on how I remove the background on my photos.
White Background Blog Post
My color is usually pretty good, but I do add brightness and contrast to all of my photos.
I am not at all an expert, just thought I could offer what has been working for me lately.
Square White Background Photos


I am by no means an expert. This is how I do my backgrounds, there are 100 better ways; this is what works for me. Hope this helps you find what works for you. :)
Saturday, June 7, 2008
Add a color background for White Objects
PhotoShop Elements 5.0 ~ Edit and Enhance Pictures
If your background is a different color than the object, use the 'Magic Wand Tool' to select the background color. When it is selected hit Delete on your Keyboard.
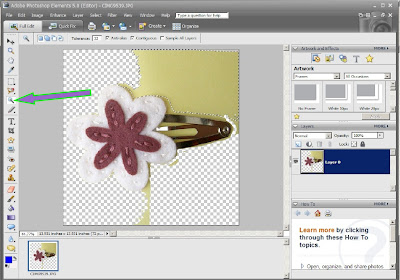
You may have to repeat this step on different areas of the photo.
Select the whole object again, using the 'Rectangle Marque Tool' (Square Outline)
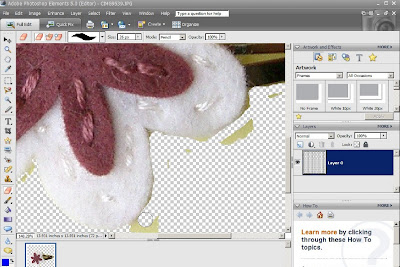
Zoom into your photo and clean up the edges with the 'Eraser Tool'
Depending on how picky you are, this could take hours or a couple of minutes.
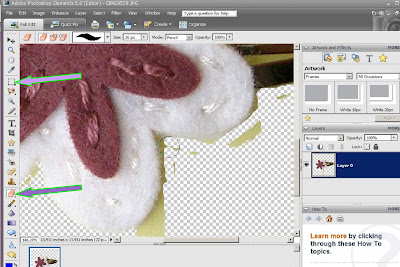
I play with this step for hours!
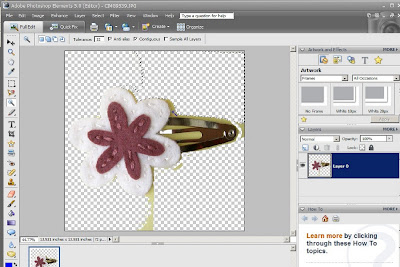
You can also change the background to white (or any color) using the 'Paint Brush Tool'
Choose the color you want to paint down at the bottom; the top color is what will be painted.
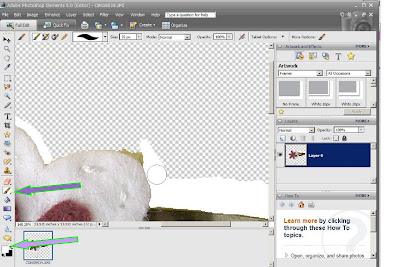
You can see I have done both on this picture Deleted some of the Background (checkerboards) and changed some to White.
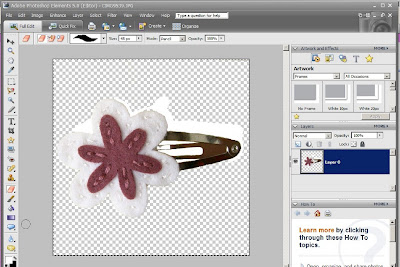
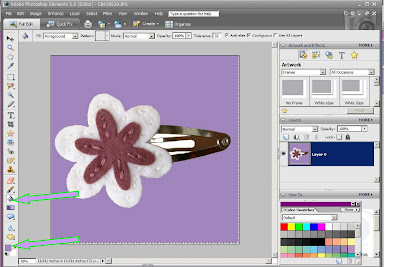
Now that your background is white or deleted, you can add a color using the 'Paint Bucket Tool'
Choose the color you want it to fill down at the bottom; top square will be the filled color.
It will paint it on the color you click on. If you click on something by mistake, Ctrl+Z will undo. :)
If your background is a different color than the object, use the 'Magic Wand Tool' to select the background color. When it is selected hit Delete on your Keyboard.

You may have to repeat this step on different areas of the photo.

Select the whole object again, using the 'Rectangle Marque Tool' (Square Outline)
Zoom into your photo and clean up the edges with the 'Eraser Tool'
Depending on how picky you are, this could take hours or a couple of minutes.

I play with this step for hours!

You can also change the background to white (or any color) using the 'Paint Brush Tool'
Choose the color you want to paint down at the bottom; the top color is what will be painted.

You can see I have done both on this picture Deleted some of the Background (checkerboards) and changed some to White.

Now that your background is white or deleted, you can add a color using the 'Paint Bucket Tool'
Choose the color you want it to fill down at the bottom; top square will be the filled color.
It will paint it on the color you click on. If you click on something by mistake, Ctrl+Z will undo. :)

Thursday, May 15, 2008
Adding Another Shops EtsyMini to my Blog
Love another Etsy Shop and want to showcase their mini on your blog?
It is easy!
Create a Etsy Mini from your shop by selecting 'Etsy Mini' on the bottom left side of Your Etsy.
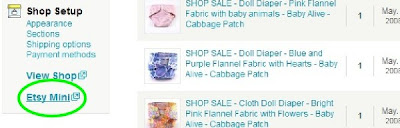
Customize the Mini for Your Shop; choose Thumbnail or Gallery and the size
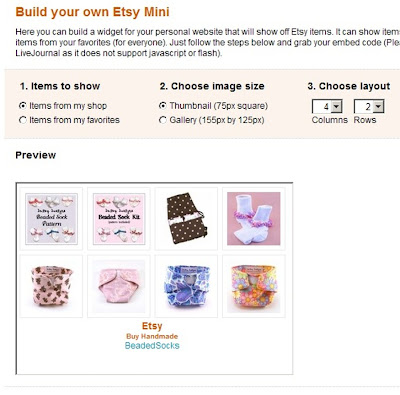
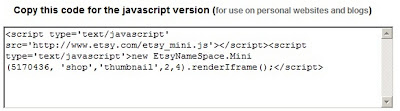
Copy the JavaScript Mini Info. Paste that into your blog post.
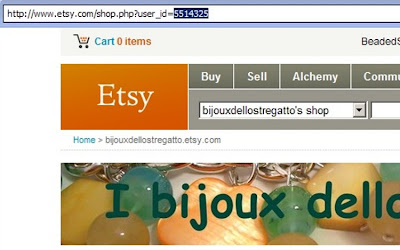
Now go find your Feature Shop and Copy the Number after the shops URL.
See the highlighted blue text '5514325' is this shops number.
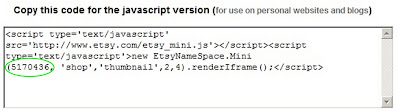
Paste that over your shop number in the Etsy Mini.
So I will replace '5170436' with '5514325'
Here is the result:
Want your mini a different size?
This number changes the height of the mini ~ from 1 to 7
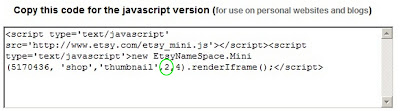
This number changes the width of the mini ~ from 1 to 7

It is easy!
Create a Etsy Mini from your shop by selecting 'Etsy Mini' on the bottom left side of Your Etsy.

Customize the Mini for Your Shop; choose Thumbnail or Gallery and the size

Copy the JavaScript Mini Info. Paste that into your blog post.

Now go find your Feature Shop and Copy the Number after the shops URL.
See the highlighted blue text '5514325' is this shops number.

Paste that over your shop number in the Etsy Mini.
So I will replace '5170436' with '5514325'

Here is the result:
Want your mini a different size?
This number changes the height of the mini ~ from 1 to 7

This number changes the width of the mini ~ from 1 to 7

Monday, March 10, 2008
Making your Blogrolling List Scroll
Paste your script from Blogrolling.com over the red words in the following code:
<div style="height:250px; overflow:auto;">
<center>
<script language="javascript" src="http://rpc.blogrolling.com/display.php?r=88737f208a75a7edb0aa862d2aa05555" type="text/javascript"></script>
</center></div>
It should look similar to this:
(click images to see a bigger)
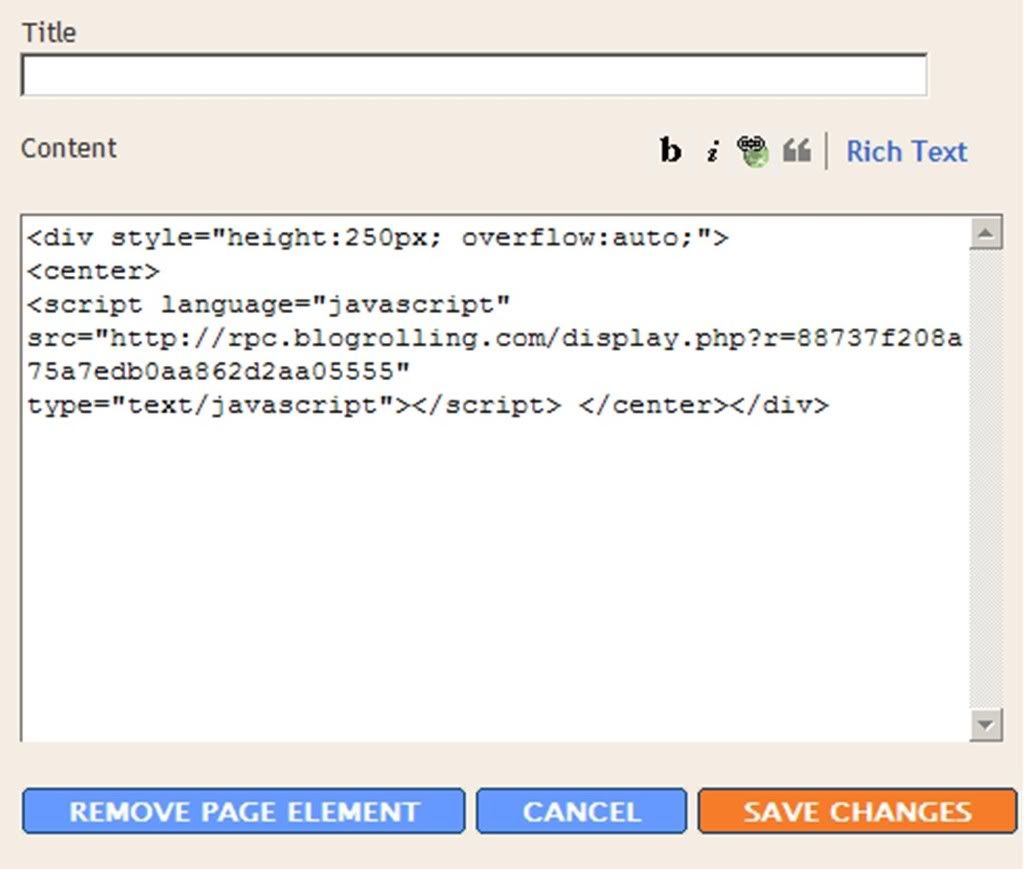
You can make the scroll shorter or longer. It is set at 250px; to make it longer type a higher number such as 350; to make shorter try 100.
When Editing ~ Do not add any spaces only type over the '250'.
If you want the links to be left aligned change the word 'center' to 'left'
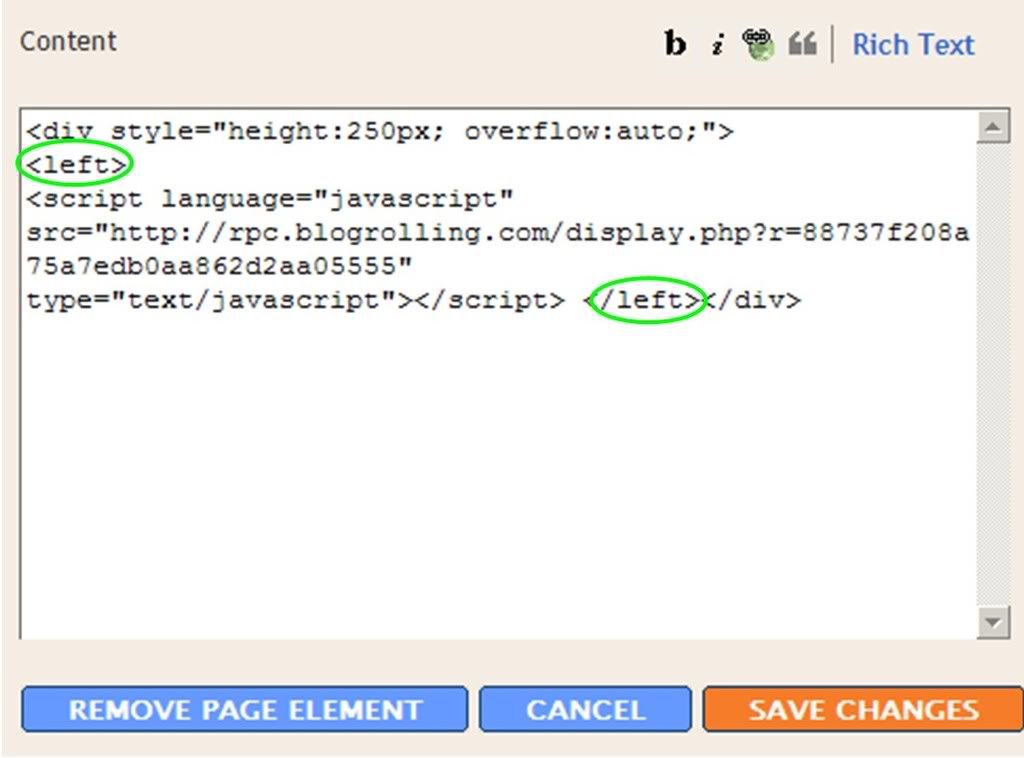
<div style="height:250px; overflow:auto;">
<center>
<script language="javascript" src="http://rpc.blogrolling.com/display.php?r=88737f208a75a7edb0aa862d2aa05555" type="text/javascript"></script>
</center></div>
It should look similar to this:
(click images to see a bigger)
You can make the scroll shorter or longer. It is set at 250px; to make it longer type a higher number such as 350; to make shorter try 100.
When Editing ~ Do not add any spaces only type over the '250'.
If you want the links to be left aligned change the word 'center' to 'left'
Tuesday, February 26, 2008
EtsyMom Blogrolling.com List
Want to make your blog list longer, so that you can see more EtsyMom Shops.....
Change the number after "height:" and before "px"
You can make it as long as you want;
300 works for mine right now, but I used to have it at 450.
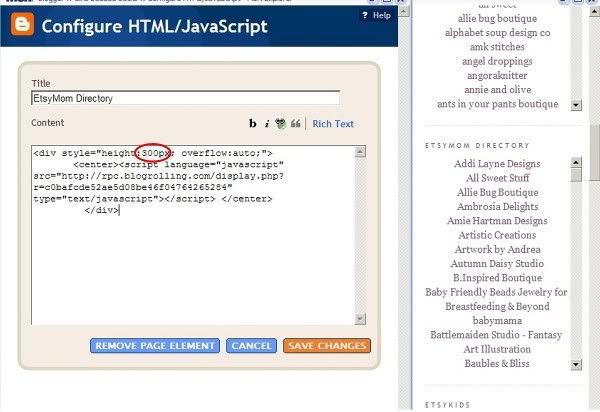
Code in EtsyMom Forum
Change the number after "height:" and before "px"
You can make it as long as you want;
300 works for mine right now, but I used to have it at 450.
Code in EtsyMom Forum
Thursday, February 21, 2008
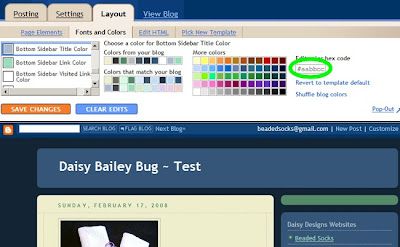
Changing Font Colors
Go to Layout; then Fonts and Colors
Scroll down until you see Sidebar Text and Sidebar Link Visited
If you don't see a color you like, go to http://www.computerhope.com/htmcolor.htm
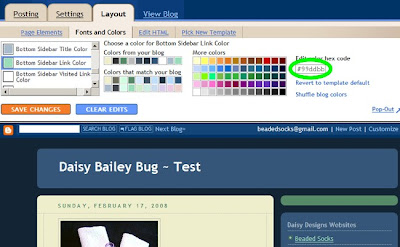
Choose your color, Copy the Code (#ffffff); then Paste it into the box highlighted with a green circle.
Save Changes

Scroll down until you see Sidebar Text and Sidebar Link Visited
If you don't see a color you like, go to http://www.computerhope.com/htmcolor.htm
Choose your color, Copy the Code (#ffffff); then Paste it into the box highlighted with a green circle.
Save Changes


Sunday, February 17, 2008
Posting a Photo from Flickr on a blog
FYI ~ I use Flickr, but do not use them for hosting my website and blog images. I prefer Photobucket.com for image hosting. People do use them for hosting, so here is how to get an image URL. :) Have a great day!
Click on the Flickr photo you want to use.
Place your mouse over the picture and Right Click
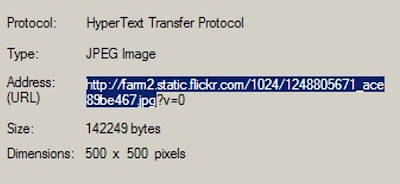
Choose Properties
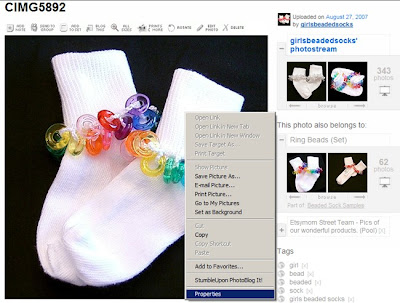
Highlight and Copy (ctrl+C) the file URL
http://farm2.static.flickr.com/1024/1248805671_ace89be467_m.jpg
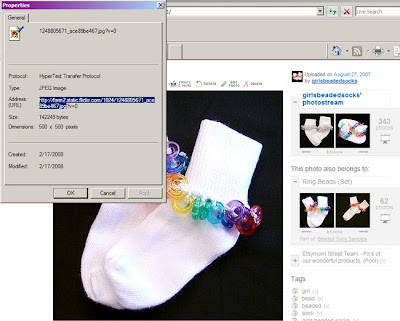
The URL will end with .jpg ~ do not copy the other information at the end of the URL. See what I have highlighted for example.
Paste (ctrl+V) into html
This code:

Produces this Flickr Image:

Add width="250" after the .jpg" to size the image ~ change 250 to any number depending on the size you want.
Click on the Flickr photo you want to use.
Place your mouse over the picture and Right Click
Choose Properties

Highlight and Copy (ctrl+C) the file URL
http://farm2.static.flickr.com/1024/1248805671_ace89be467_m.jpg

The URL will end with .jpg ~ do not copy the other information at the end of the URL. See what I have highlighted for example.

Paste (ctrl+V) into html
This code:

Produces this Flickr Image:
Add width="250" after the .jpg" to size the image ~ change 250 to any number depending on the size you want.
Friday, February 15, 2008
Edit Minima Blog Template
Log in to your Blog
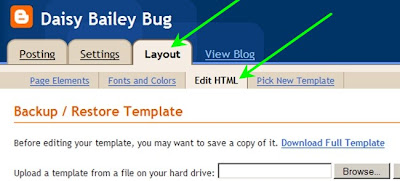
Go to 'Layout'
Then 'Edit HTML'
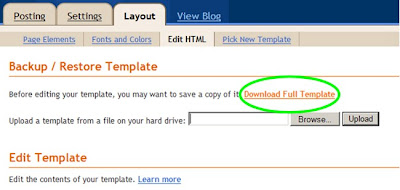
Before you change any of the code ~ Save a Copy ~
Choose 'Download a Full Copy' save it somewhere on computer ~ title blog template.
Just in case! :)
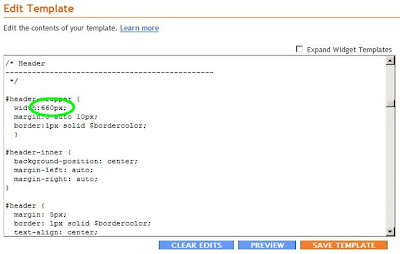
Scroll down until you see Header
Change 660 px to 820
Don't add any spaces, only change the numbers.
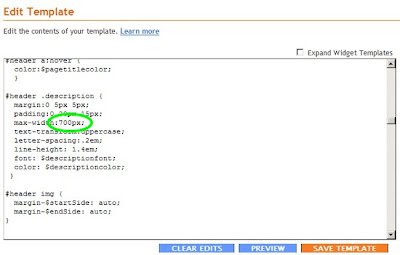
Scroll down #header description
Change 700 px to 820
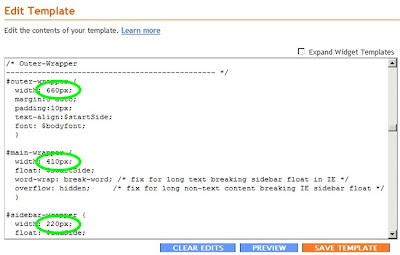
Scroll down to Outer-Wrapper
Change Outer-Wrapper width from 660 px to 820
Change Main-Wrapper width from 410 px to 600
Leave Sidebar-wrapper at 220. Main-wrapper and Sidebar-wrapper can be adjusted.
Together they should be less than 820.
Scroll down to #footer
Change width from 660 px to 820
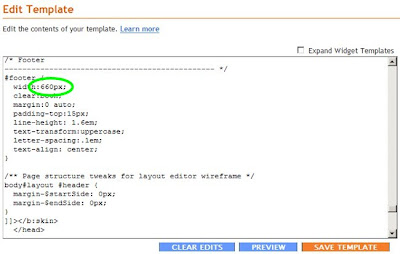
Click 'Save Template'
Go to 'Layout'
Then 'Edit HTML'

Before you change any of the code ~ Save a Copy ~
Choose 'Download a Full Copy' save it somewhere on computer ~ title blog template.
Just in case! :)

Scroll down until you see Header
Change 660 px to 820
Don't add any spaces, only change the numbers.

Scroll down #header description
Change 700 px to 820

Scroll down to Outer-Wrapper
Change Outer-Wrapper width from 660 px to 820
Change Main-Wrapper width from 410 px to 600
Leave Sidebar-wrapper at 220. Main-wrapper and Sidebar-wrapper can be adjusted.
Together they should be less than 820.

Scroll down to #footer
Change width from 660 px to 820

Click 'Save Template'
Subscribe to:
Posts (Atom)